To fish near the bottom using
feeder equipment , you need to use special tackle and special installation methods. Fans of
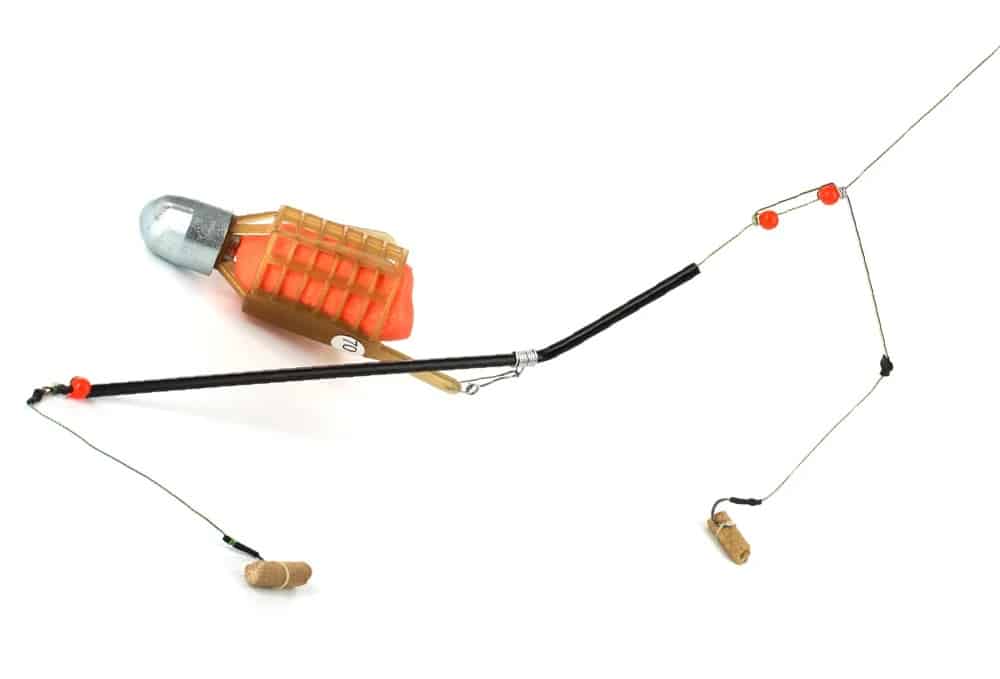
feeder fishing in many situations on the shore consider the use of mounting – Gardner’s loops (in the general version of a paternoster) – the best solution. In order to understand how to knit and fish with a paternoster, you need to learn more about this popular mounting method.
- What kind of editing, its pros and cons
- How to knit a paternoster for a feeder – step by step instructions
- Classic tackle
- Paternoster with sliding outlet for feeder or LNG (Gardner sliding loop)
- Option “Sport”
- Tackle with feedergam
- Under what conditions is it applied
- How to fish with a paternoster
- Поделиться ссылкой:
What kind of editing, its pros and cons
For fishing with a feeder, fishing rods equipped with a quiver tip are used. The fish bite will immediately become visible to the fisherman. One of the main features of the paternoster is that the fish self-chokes with this type of mounting. Knitting paternoster is carried out as follows:
- The main line must be folded in half.
- Having stepped back from the edges by 15-20 cm, they make a knot.
- The resulting loop is cut in such a way that one end exceeds the other by a third.
- A feeder feeder is attached to the short end , and a leash with a hook is attached to the long end .

- The equipment of such a feeder tackle can be carried out directly on the shore of the reservoir.
- Manufacturing takes only a few minutes, and you don’t need to use any complicated fixtures.
- Paternoster makes it easy to see and feel the bite on the quivertip while holding the rod.
- When biting, in a significant number of cases, self-chopping occurs.
This fishing method has the following disadvantages:
- The presence of a scythe of fishing line (used in several versions) is noticeable to fish. If she is careful enough, it will scare her away.
- When connected to the feeder, the line may fray.
- If caught in a strong current, the sensitivity during the bite decreases.
- When the tackle is cast over a long distance, there is a high likelihood of overlap.
Despite the complexity of its use, the popularity of this fishing method is growing.
How to knit a paternoster for a feeder – step by step instructions
There are several paternoster options. Each of them is intended for use in specific conditions. When tying knots, it is recommended to moisten them before tightening. This will make them more durable. When a special piece of fishing line is used to lead to the trough, a thinner line is chosen. This is necessary so that when a break occurs, the feeder most likely comes off, and the fish remains on the hook.
Classic tackle
The most common – the classic version is used mainly for fishing on a tight bottom or with close casting of tackle. The knitting algorithm is as follows:
- You need to fold the main line in half.
- At a distance of 15-20 cm, the doubled thread is tied with an eight knot.
- A small loop is made at the end of the loop. To do this, at a distance of 2-3 cm, an eight knot is made.
- The tip remained from the double. It should be long enough to go beyond the trough.
- A small loop is made on it to connect with a pre-prepared leash.
- You need to attach a leash and a feeder.
Paternoster installation is complete.
- Installation can be done using a separate line or on the main line. Next, the first option will be considered. You need to fold the line in half.
- A swivel and locking beads are put on it. With the help of the latter, you can fix the position of the feeder. These elements should be at the fold of the line.
- Measure 15-20 cm from the fold and tie a knot in this place. For example, you can use the figure eight for this .
- At the remaining single end, a loop is made with a length of 2-3 cm. It is intended for attaching a leash with a hook.
- Attach a leash and feeder.

- The line from which the tackle is made is folded in half.
- At a distance of 15-20 cm from the fold, they are tied with an eight.
- The loop is placed on a flat surface, the tip is repeatedly twisted around its axis in order to obtain a rigid twist.
- 2-3 cm from the fold, you need to tie a knot (for example, an eight). It will fix the curl and prevent it from breaking apart.
- At this stage, a small loop, twist, single line lead will be created. The feeder will be fixed on the twist. A small loop must be made at the line outlet to attach the leash.
Twisting will prevent the tackle from tangling while fishing.
Paternoster with sliding outlet for feeder or LNG (Gardner sliding loop)
The sliding paternoster is equipped with a stopper that allows the feeder to be positioned at the desired distance from the leash. This tackle has a high sensitivity. When the line breaks, the fish is freed from the load of the feeder. To tie this tackle, you need to follow these steps:
- The main line is passed through a swivel.
- A stopper is put on, with which the position of the feeder will be fixed. You can use a rubber stopper or a plastic bead for this.
- A loop is made at the end of the thread, to which a leash with a hook should be attached.
- A line is attached to the swivel using a “double clinch” knot to attach the feeder.
- A loop is made at its end, on which the feeder is fixed using a cape.
This completes the production of the tooling.
Option “Sport”
This type of paternoster tackle gets its name from what is often used in sport fishing. Fishermen note the effectiveness of this option. Another advantage is the ease of knitting. To make the tackle in this way, you will need to perform the following actions:
- A swivel is put on the main line, then a stopper.
- At the end of the braid, you need to make a small loop with the help of an eight knot to connect the leash.
- To fix the feeder, you need to tie a piece of thin thread to the swivel. To do this, you can use the Palomar node . A small loop is made at the free end.
- The stopper with a swivel is pushed to the loop for the leash at a distance of 10 cm.
- A swivel with a carabiner is attached to the loop for attaching the feeder. A container with food is connected to it.
- Tie a leash with a hook.
Now the installation of the tackle is over.
Tackle with feedergam
The only difference from the classic tackle of this option is the use of a feedergam – a rubber insert. She joins the leash. A special kind of rubber is used here. How to knit a paternoster with a Feedergam bend: https://youtu.be/I9qGx81iPhk Feedergam has carbines at both ends. One of them is used to connect with a short branch, the other is used to connect a leash with a hook. The use of this device is beneficial when fishing for large and active fish. If the line is not flexible enough, it may break. The rubber seat will soften the jerk and keep the fish on the hook. How to knit a paternoster for a feeder: diagram and explanation with video: https://youtu.be/SjsRif1G7eY
Under what conditions is it applied
The use of a paternoster is effective both under current conditions and in calm water. The fish bite well where there is underwater vegetation or there is a muddy bottom. When fishing for active fish, the sensitivity of the tackle to the bite increases.
How to fish with a paternoster
When using a paternoster, fishing will be more successful if the following tips are taken into account:
- You need to throw the feeder in exactly the same place . Even if there is no bite within the first hour, you need to make frequent casts, refilling the container with food.
- Having chosen a place at random, you can often be left with little or no catch. It is recommended to conduct a bottom survey with a marker weight , study its relief, find irregularities and places with dense vegetation and try to fish in the most promising areas.
- When fishing with a feeder, the quality of the feed plays an important role . It should contain tasty and aromatic ingredients. When the bait begins to disintegrate after a dive, spreading its aroma, it actively attracts fish.
- Thin lines and hooks will be more effective because of their stealth .
- When fishing with feeder tackle, you need to cast more often compared to normal fishing . If you sit and wait all the time, you cannot expect a good catch.
- In order to master the art of fishing with a paternoster, it is necessary to constantly practice using various accessories and experimenting.
Having come fishing, you need to have spare accessories: hooks, fishing line, stoppers and others.