
Sometimes when fishing, it may be necessary to tie two lines with different physical properties. An example is the need to tie a fluorocarbon
leash on a
braid.or mono. Such connections may, for example, be needed when connecting the main line / line and a fluor leader. Since the second material has significant rigidity, knots with many sharp bends will not work for it. In such cases, special nodes are used. Their distinctive feature is that the stiffer thread will bend slightly, and the most difficult part of the knot will be made with a flexible thread. This category includes the Carrot knot, which is most often used for tying braids and fluorocarbon or fishing line, a little less often for tying braids and braids. It combines a simple knitting method with high strength to create a reliable tackle.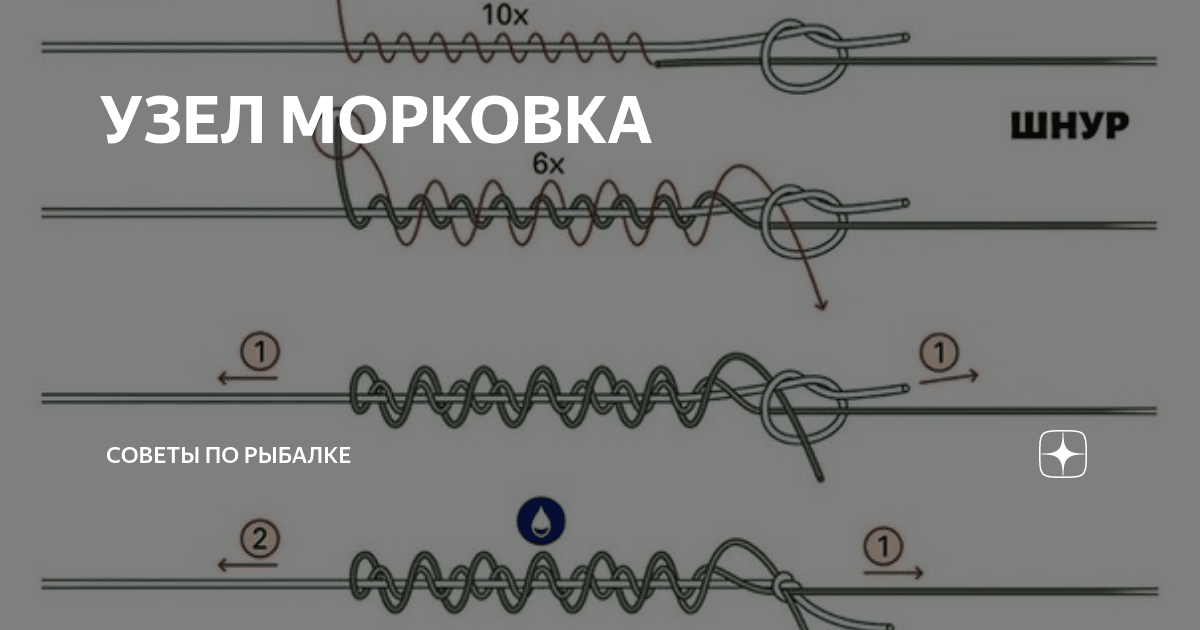
How to knit a classic carrot knot – diagram, photo, tips
This knot combines ease of knitting and high reliability. When creating it, it is important to carefully follow each step, in this case you can be sure of its quality.
For braiding and braiding
The classic way of knitting a knot involves the following actions:
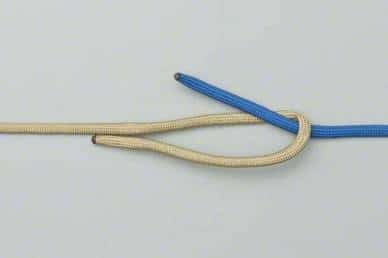
- Both threads are laid out parallel to each other.
- On the first braid, a simple knot is made so that it wraps around the second.
- If necessary, the loop must be moved so that it is 15 cm from the edge of the second line.
- Both segments are applied to each other. The end of the second loop is used to create a simple loop. It is not necessary to delay it at this stage.
- The thread is wrapped around both threads many times within a large loop. Ten turns is usually sufficient.
- The last created loop must be tightened, pre-moistened.
- Both threads must be pulled in different directions so that the nodes move towards each other. Any protruding pieces of line can be trimmed, leaving a few millimeters.


Now the Carrot node is ready:
How to knot a carrot knot for braiding and fluorocarbon / fishing line
In this case, you can apply a more complex option. To link it, you will need the following actions:
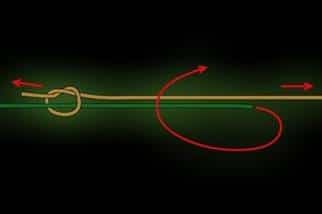
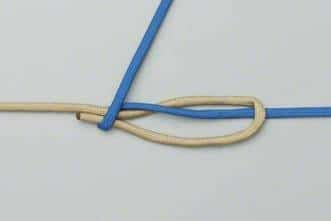
- Both threads are parallel to each other.
- A simple knot is made with the tip of a fluorocarbon fishing line (monofilament), clasping the braid.
- Pulls the braid through it so that at least 20 cm remains.
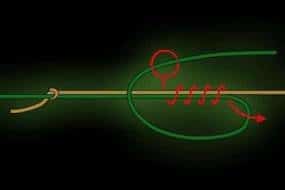
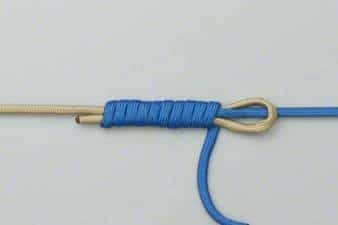
- Immediately after the loop, they begin to wind the fluorocarbon thread, moving along it. You need to make at least ten revolutions.
- After that, you need to move back, repeatedly winding the thread.
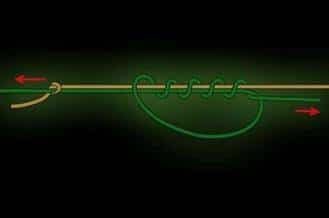
- It is also necessary to make at least 10 revolutions in this direction.
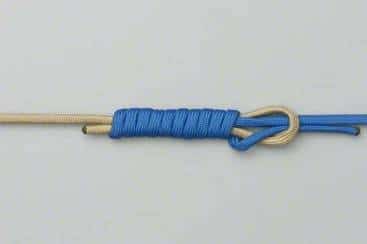
- After that, the braid is threaded into the loop created initially.
After that, you need to moisten the knot and tighten it carefully, evenly. Wetting reduces friction and allows for better knot tightening. In order to better present. How the considered version of the node is created, you can see the following diagram.

shock leader [/ caption]
Pros and cons of the “carrot” knot
Using the Carrot node allows you to take advantage of the following benefits:
- This knot is reliable and does not come loose during use.
- No slipping occurs after it is tightened.
- It can be used to connect different and uniform lines.
- Mastering is not difficult.
- It is effective for tying strings that have different diameters.
- The use of the knot ensures high rigidity of the tackle.
- The assembly is compact enough to pass through the rings when casting.
The use of the node is associated with the presence of such disadvantages:
- A knot demonstrates its advantages only if it was tied neatly, in strict accordance with the rules.
- In order to use it confidently, you need to train, bringing the knot to a skill level.
- In order for the knot to be used for a long time, it becomes necessary to tie it up after certain periods of time.

Typical mistakes
When knitting, the number of turns made is left to the discretion of the fisherman. At first glance, it may seem that their number can be reduced to 2-3. In fact, this will lead to a sharp decrease in the reliability of the node. It is recommended to make at least 10 loops. If they are made a little more, then this will not reduce the strength of the connection. When using the full version of the knot, you need to count the loops in the forward and backward strokes. It is considered reliable if their number is 20 in total. Some consider wetting before tightening to be insignificant. In fact, in this case, the friction force increases sharply. As a result, the line may burn out, be abraded or mechanically damaged. Doing soak while tightening eliminates the possibility of such problems.
Practical advice
When creating turns, you need to take care that they lie flat and parallel to each other. When tightening, it is necessary that they tighten evenly, keeping their position. Reverse turns are sometimes neglected by fishermen. They simply pull the tip into the loop and tighten the knot. In this case, its strength decreases sharply. A sufficient number of reverse turns is necessary to create a reliable assembly. When threading the end into the loop, it is important to pay attention to which side it is being done from. If pulled from the back, the knot may come loose during use. Sometimes, to increase the strength of the knot, the ends of the fishing line are burned with a match or a lighter. As a result, thickenings form at the tips, which will increase the reliability of the knot.
Alternative nodes for the same purpose
For the same purposes as the Carrot knot, Albright is used. The process of linking it has similarities with the considered option. To tie this knot, you need to take the following steps:
- The end of one line is folded in half. If threads of different diameters are considered, a thicker thread is used for this purpose.
- Another thread is threaded into the fold.
- The end is pulled to the point where the double cord ends.
- It needs to be enclosed.
- The double cord, together with the stretched line, is wrapped at least 10 times, moving towards the fold.
- The tip is threaded under the fold.
- The knot must be wetted. Tightening is done slowly and carefully, taking care that the loops do not move. The protruding pieces are cut off, leaving 2-3 mm.


Albright node is ready. You can also tie two lines by using the Blood Knot. To do this, you need to do the following:
- The two threads are placed towards each other so that about 20 cm are parallel.
- The end of the first line is wrapped around the second several times. The remainder is returned to the middle and threaded between the threads.
- The second end is wrapped in the same way around the first line. After that, it is threaded through the central part in the opposite direction with respect to the first tip.
- The knot must be wetted and carefully pulled off. After that, knitting the Blood Knot will be completed.
The number of turns depends on the thickness of the line. For a thin one, 6 turns are used, for a thicker one it will be enough 3. How to knit a knot correctly can be clarified on the diagram.


