A jig is that fishing lure
for winter fishing for centuries, which will be relevant regardless of time, space and fishing skill. It is simple in design and does not require specific skills from a fishing enthusiast; it is from her that they begin to master the fishing science of “winter roads”. If the jig is not tied correctly, it can not only involuntarily untie and fall into the water, but also allow the fish to “slip away” at the most crucial moment. Moreover, if the jig is not at a natural angle, it will malfunction during animation and may even scare the fish away.
- How to choose a jig for fishing conditions – what to look for
- What does the material of manufacture affect
- Lure weight
- Colors
- What shape and size affects
- What should be a good knot for tying a jig
- Universal knots for tying jigs: a visual photo
- How to tie a second jig to the main line on a winter fishing rod
- How to tie a jig with an ear on a fishing line
- Clinch knot
- How to tie a jig with a loop
- Eight (double)
- Palomar is an effective way to tie the jig to the main line
- How to tie a jig without an ear – reliable proven knots
- Universal unit for a jig without an eyelet with a hole
- How to tie a rewinder
- Поделиться ссылкой:
How to choose a jig for fishing conditions – what to look for
To choose the right jig, you need to take into account several factors at once:
What does the material of manufacture affect
Jigs made of different materials have different weights and volumes:
- Tin . This material is well suited for shallow, up to five meters, water bodies without flow. Tin is very light, but these jigs can be an excellent start to fishing for those who are just learning – as a rule, fishing with tin jigs is easy.
- Tungsten . Tungsten jigs are used for fishing at great depths with strong currents, because they have a small volume, but significant weight. They are characterized by a particularly active game.
- Lead . One of the cheapest lures suitable for great depths. Their game is smooth, which makes it easier to hunt passive fish during the dry winter.
Lure weight
The weight of the jig must be taken into account, since it depends on how active and smooth the game will be. Weight largely correlates with the thickness of the fishing line on which the jig will be tied, they should complement each other. Approximate data are given in the table:
| Jig weight, gr | Line diameter, mm |
| 0.1-0.2 | 0.08 |
| 0.3-0.5 | 0.1 |
| 0.6-0.8 | 0.12 |
| 0.9-1.9 | 0.15-0.18 |
| 2-5 | 0.20-0.25 |
You should also know that:
- At shallow depths, shallow jigs are suitable for catching small fish, and large ones – for large ones.
- Thanks to a light jig, the animation becomes simpler and livelier, but at depths of 2 meters or more, you cease to feel such a lure clearly. That is, the weight must be chosen taking into account the depth of fishing and the strength of the current.
Colors
The color of the jig is important, especially when fishing at shallow depths. There are some rules (dogmas?) That anglers adhere to during winter fishing: Black or red jigs are better at luring perch and
roach . Yellow colors are to the liking of
bream . The lighter the water, the darker the color of the bait should be – and vice versa. This allows for contrast. The colors must be selected according to the food base prevailing in the reservoir. At a depth of more than 5-8 meters, the light does not pass enough for the fish to distinguish ordinary colors, it sees only colors in the ultraviolet range. For such places anglers use fluorescent colors.
What shape and size affects
These parameters directly affect the game of the jig. The shape is selected on each fishing trip based on numerous factors, the realization of which comes with experience. Size is directly correlated with weight. Larger lures are appropriate at depths and in the current. Small when fishing in shallow water in stagnant waters.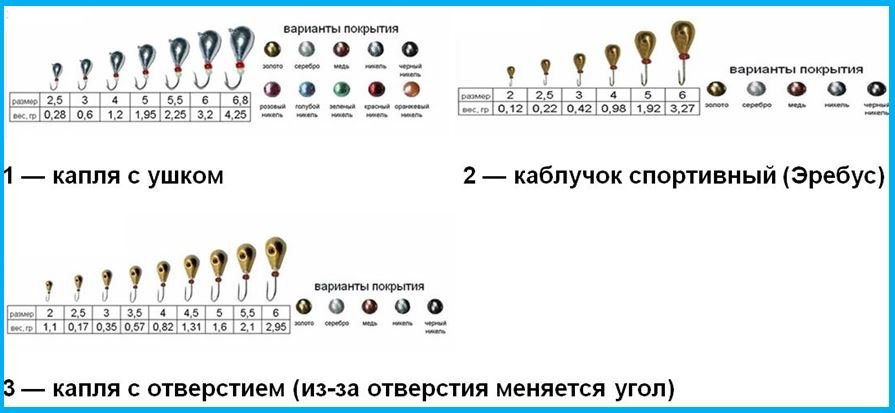
What should be a good knot for tying a jig
Mormyshki are completely different, both in the method of tying, and in the required position under water and the required degree of freedom. Some behave well on a free loop, and some need a blind knot, some need an upright position, and others work better with horizontal fixation.
Important! Ears on some jigs can be located at different angles. As a result, it is not always necessary to thread the line exactly from the side of the hook.
Knitting jigs of any type should be based on the following rules:
- Calculate line thickness . The thickness of the line affects the number of turns in a knot, because the thinner the line, the more likely the knot will come loose, which means more turns need to be done.
- Also, it is easier to form a large angle using thick line and vice versa – the thinner the line, the easier it is to make the angle smaller.
- Before tightening the knot, it is advisable to moisten it with water or saliva . This will reduce the frictional force of the line, making it less likely to overheat.
- It is never too late to practice tying knots and is always beneficial . The more practice, the more reliable and faster the process of tying the jig will be. Over time, even complex knots will be easy to tie even in cold weather.
- The jig with the bloodworm should be located almost horizontally – as close as possible to ninety degrees relative to the water.
- The rewinder is usually tied so that it is at an angle from zero (vertical) to 30-45 degrees.

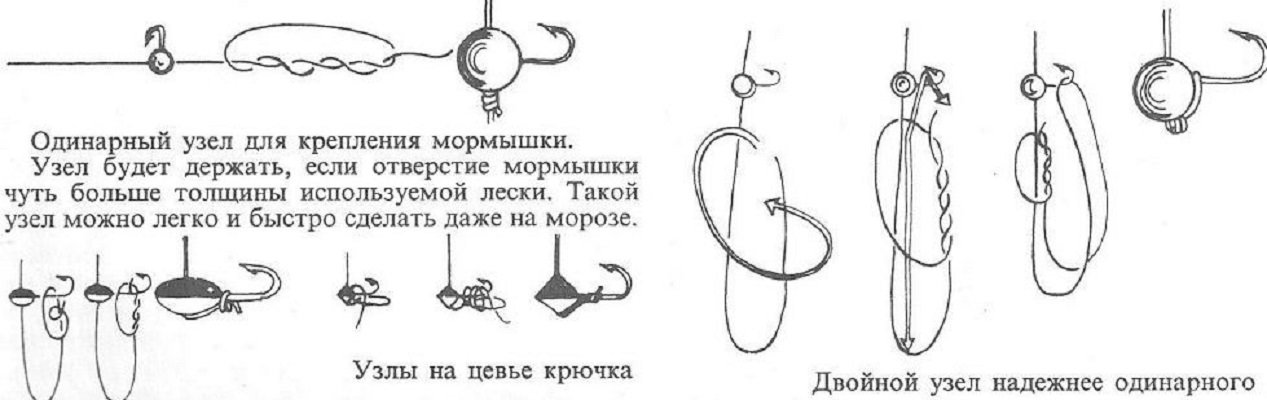
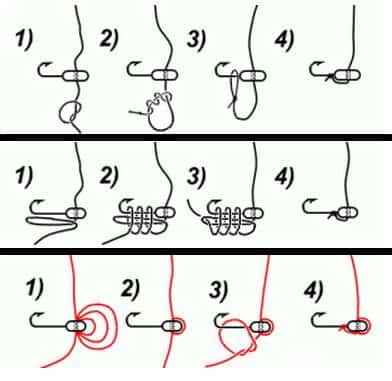
Universal knots for tying jigs: a visual photo
The universal knot, which is suitable not only for jigs, but also for ordinary hooks, can be used in almost any situation. To tie it, you need to do the following:
- Thread the fishing line, bend the tip that comes out so that a loop is formed.
- With the other end, wrap the resulting loop several times at the base of the hook with a short end. Note: The number of turns depends on the thickness of the line: the thicker the line, the more turns you need to make. So, for example, for a 0.08 mm line, at least eight turns are necessary, and for a thick one (from 12 mm), four will be enough.
- Thread the remaining tail into the loop and tighten it tight. If it happened that the monofilament was tightened too tightly, but a small loop still remained, do not worry. This does not greatly affect the process, however, you can push the short end back a little by returning to the previous step. If the result is not satisfactory, it is enough to make a little effort and cut the line across the resulting revolutions.
- Trim off excess – a ponytail that is no longer needed, leaving 2-3 millimeters to avoid unraveling the knot.
How to tie a second jig to the main line on a winter fishing rod
In some cases, when fishing, it is necessary to tie two or more jigs with a train, we suggest several quick and reliable methods below. The easiest way to tie two jigs is to put the first one through the hole, fix it with a fishing float stopper, and tie the lower one using one of the methods suggested below / above. You can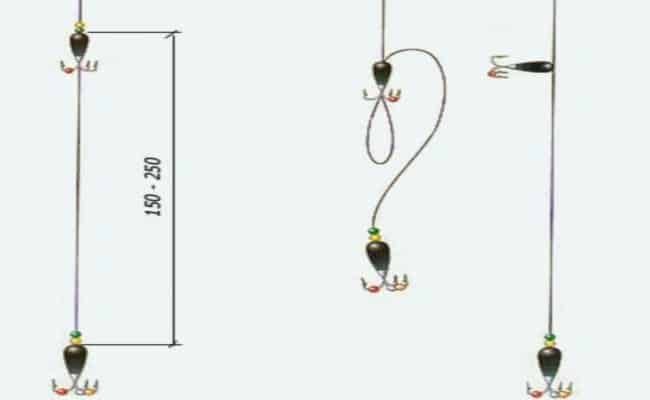
How to tie a jig with an ear on a fishing line
Clinch knot
One of the most popular options is the clinch knot, or gripping knot, clearly:
- Thread the line through the eyelet.
- Tail several times to wrap the second part of the fishing line (like a “snake”), leaving a small loop at the base.
- Pass the tail through the loop and tighten by moving the “snake” to the jig.

Hence the conclusion! We “clinch” the jig only on a relatively thick fishing line, and hence consequence number two – such a knot is suitable for relatively large jigs.
How to tie a jig with a loop
For tying jigs with an eye, knots-loops are better suited. The universal knot is well suited, but there are better options, since the first does not allow the jig to play enough in the water. In this case, you will have to make great efforts both intellectually to come up with an effective animation, and with your hands to set it, and you can do without it. At first glance, the knot seems frightening and unusual, however, everything is much simpler than it seems:
- Tie the usual “woman” knot, but do not tighten it, leaving a sufficiently large loop and tail.
- From the side of the hook, thread the fishing line, leaving the jig at the not tightened knot.
- Fixing the jig with your finger, wrap the tail around the base that attaches to the fishing rod. An average of five to six revolutions is enough here.
- Insert the loop on the tail, turn it back and tighten.
The
- The resulting corner is always one and holds well after biting. There is no need to bandage it several times each time.
- The knot is durable, perfect for winter, summer sport fishing.
Flaws:
- Hard to tie in the cold, especially with gloves.
Eight (double)
Eight is one of the easiest knots to learn. Having learned how to tie it, we can assume that the first steps in mastering some of the more complex other knots are already known. To tie an eight, you need:
- Thread the line through the jig, then fold the line in half.
- Putting one end of the line on the other, make a loop and turn it 1 more time. To make the loop smaller, you can move it with your fingers.
- Thread the jig through the loop. If the loop was turned clockwise, thread the jig away from you. If counterclockwise, then towards yourself.
- Tighten by moving the knot closer to the jig with your fingers.

- free hanging jig and the same animation;
- very easy to learn;
- is the beginning of several other nodes.
Such a knot can be used to tie a classic nail ball to the fishing line:
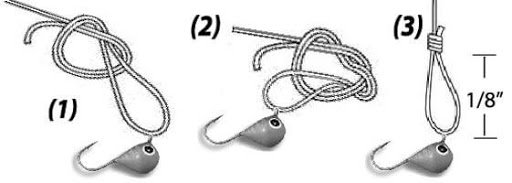
Palomar is an effective way to tie the jig to the main line
Another very famous site. Many spinning players know how to tie it “with their eyes closed”, it is not difficult to learn this:
- Fold the line in half so that one end is much shorter than the other, but not too much – otherwise the knot will open.
- Pass the loop through the eyelet.
- Tie a regular knot with the resulting loop and the other end, but do not tighten it.
- Pull the loop a little and thread it through the hook so that it ends up under a simple knot.
- Can be tightened by guiding a regular knot towards the ear with your fingers.


- This knot can be called universal, since it is easy to tie it on ears of any size.
- Best for slippery lines.
Flaws:
- Large line consumption.
- It is impossible to undo the penultimate and last knitting action – in case of an error, you will have to start tying again.
How to tie a jig without an ear – reliable proven knots
Universal unit for a jig without an eyelet with a hole
The most popular and one of the simplest is the universal knot. It is not difficult to master it:
- Thread the fishing line and twist the tail a little so that a loop is formed, it should be long enough.
- Thread the tail through the resulting loop several times.
- Pull the ends a little.
- Pass the fore-end through the resulting several loops, pull it to the base of the jig and tighten it completely.

How to tie a rewinder
The knot for
soapless jigs looks quite unusual compared to some others, since its base is attached at the base of the hook. To tie it, you need:
- Pass the fishing line through the hole and place it along the jig, parallel to the hook.
- Bend the tail and make a few turns around the hook and the first half of the line.
- Thread the tip into the loop formed at the fold.
- Tighten the knot on both sides.

- Compact and does not interfere with bait play.
- Sturdy, well suited for deep depths.
How to properly tie a devil’s jig to a winter fishing rod: https://youtu.be/AKlgbmRIJ-s Having familiarized yourself with different types of knots for different types of jigs, you can confidently tie the bait without getting lost after buying a new item.